Whether you need the perfectly proportioned Facebook photo or just want to save space on your hard drive, resizing an image is a super important skill for modern-day photographers. Don’t know where to begin? You’re in luck because we’ve compiled a tutorial to help you learn how to create perfectly formed photos with ease!
Creating gifts for your friends? Image resizing can be crucial for photo books. Cropping the images before uploading can help the photo book look bright and slicker. Similarly, resizing images to fit perfectly on non-uniform gift items such as personalised photo mugs is fundamental.
Online Image Resizers
There are loads of online image resizers than you can use to adjust your photos to the dimensions you want. Which one should you choose? It’s really up to you. From LunaPic to PicResize, there are lots of great options to explore. So, how do they work?
First off, upload your image to the site.
Then, choose how you want to resize your image. You can choose either a percentage of the current image size, i.e. 50% or 75%, or you can select from a number of presets For example, you can choose to resize your images specifically to fit an 800px resolution screen.
Finally, you download the file. It really couldn’t be simpler.
Now, let’s take a look at some of the other programs that you can use to resize images.
Preview
If you’ve got a Mac, you can resize an image on Preview. How does it work? Simple.
Open the image file in Preview.
Click on ‘Tools’ in the toolbar and then ‘Adjust the size.’
Enter the new dimensions that you want or click on a common size from the ‘Fit into’ menu.
If you want to make sure that the image retains its original proportions, click on ‘Scale proportionally.’ Height will automatically scale when you change the image’s width and vice versa.
Select ‘Resample image’ if you want to make the image smaller without sacrificing any details.
Click OK when you’re done and you’ve got a resized image.
Windows Live Photo Gallery
If you’ve got Windows Live Photo Gallery installed on your computer, you can do your image resizing in minutes.
Go into ‘Edit’ on Windows Live Photo Gallery.
Select the photos you want to resize.
Right click and select the resize
Choose the new dimensions you want for the image. You’ll be given a range of choices, from preset sizes like smaller, small, medium and large to custom, where you can decide for yourself what new dimensions you want.
Once you’ve settled on a size, save your image and you’re done!
Microsoft Paint
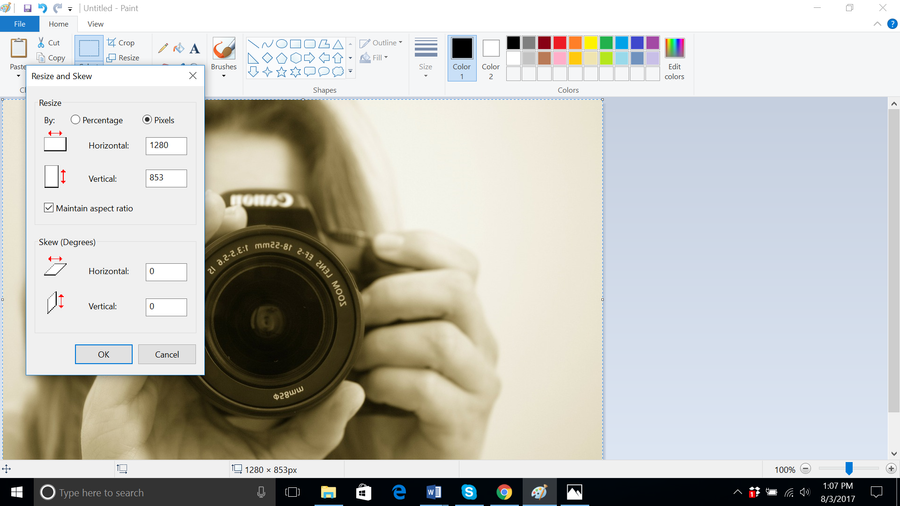
Microsoft Paint, it may be basic, but as an easy-to-use tool for resizing images, it can get the job done in no time.
Go into Microsoft Paint.
Click the ‘Resize’ button in the ‘Image’ toolbar.
Choose your resizing method.
You can either choose to resize by pixel size or percentage.
Select your new dimensions, as well as the degree of skew you’d like to introduce to your image, if any.
Click OK and save the image.
Voila, you have a resized image.
Cropping
Of course, there are a few other methods that you can use to resize your images. First off, you could learn to crop. It’s pretty low-tech, but it gets the job done just as well as any other image resizing program. It also lets you control exactly what you keep and what gets left behind, making it the ideal tool for creating the perfect image for your social media. Whether you’re after the perfect Twitter header photo or just want to make your snaps bang on the Gram, cropping is one of the most essential tools out there for the budding photographer.
Which size for your images?
So, now that you know how to resize an image, it’s probably useful to know what the best dimensions for an image are. Resizing an image for your webpage? Most desktop computers have a content area of about 960 pixels, making that a great width if you’re looking to scale down a large image. What about if you’re resizing an image for social media:
180×180 are the best dimensions for a profile pic on Facebook.
828×315 is best for a cover photo on Facebook.
110×110 is best for a profile pic on Instagram.
1080×1080 are the best dimensions for your photos on Instagram.
400×400 are the best dimensions for your Twitter profile pic.
Once you’ve made the edits you’re ready to upload: Go and grab yourself a hot mug of coffee from your personalised mug range. You’re now a master in the fine arts of resizing images.
Next time you’re taking snaps, be sure to apply what you’ve learned. The results might amaze you!